C++ & Trading Systems Interview
Overnight cramming has helped no one. This is NOT a last minute tutorial for LeetCode style problems. Go to references section for further exploration.
Use thy precious’s cpplayout and change -std=c++17 to your fav C++ spice and ensure you’re on Linux. Or just admit OnlineGDB is better for the job.
1. Keep me in your memory
Question: Why is it advisable to use std::string_view (C++17) over reference to std::string?
A std::string is 32 bytes long as it has to maintain capacity to store potential addition of characters
struct string_impl {
    char* ptr;        // pointer to character buffer
    size_t size;      // current length (not including '\0')
    size_t capacity;  // allocated capacity
};
which string_view does not need hence is smaller (16 bytes).
struct string_view {
    const char* ptr;      // pointer to character buffer (non-owning)
    size_t size;          // length of the viewed string
    // Note: no capacity, as string_view does not own memory
};
Let’s see with an example
#include <iostream>
#include <string_view>

void printAddr(std::string_view sv)
{
	std::cout << (void *)sv.data() <<"\n";
}

int main()
{
	std::string s {"How Long"};

	auto ptr = s.c_str();
	std::cout << (void *)ptr << "\n";
	printAddr(s);

	s += "too ";
	ptr = s.c_str();
	std::cout << (void *)ptr << "\n";
	printAddr(s);

	s += "loooooooooooooooooooooooooooooooooooong";
	ptr = s.c_str();
	std::cout << (void *)ptr << "\n";
	printAddr(s);
	return 0;
}
0x7ffce0e132f0 | Underlying pointer of string object creates memory
0x7ffce0e132f0 | String view looks at the same memory

0x7ffce0e132f0 | A few Additional characters didn't exceed capacity
0x7ffce0e132f0 |

0x622dbdb1e6c0 | But a shit ton did. New memory space was required to accomodate them
0x622dbdb1e6c0 | String view is looking at the same memory location
Size of pointers depend on architecture of the machine. Its always the word size, i.e., 8 bytes for 64 bit machines.
#include <iostream>

int main()
{
	char ch;
	char ptr[3];
	char *cpy = ptr;
	std::cout << sizeof(ch) << ", " << sizeof(ptr) << ", " << sizeof(ptr+0) <<", "<< sizeof(cpy) << std::endl;
	return 0;
}
C++ is going to see ptr as an array object of size 3 while (ptr+0) as a character pointer. Therefore both (ptr+0) and cpy yields 8 bytes.
Its impossible for a class to have an object with size = 0 as that would imply multiple objects existing at the same address.
#include <iostream>

class WithCharMember { char _placeholder; };
class WithIntMember { int _placeholder; };
class WithNoMember {};

int main()
{
	WithCharMember charArray[10];
	WithIntMember intArray[10];
	WithNoMember noArray[10];
	std::cout << sizeof(WithCharMember) << "*10 = " << sizeof(charArray) << std::endl;
	std::cout << sizeof(WithIntMember) << "*10 = " << sizeof(intArray) << std::endl;
	std::cout << sizeof(WithNoMember) << "*10 = " << sizeof(noArray) << std::endl;

	return 0;
}
1*10 = 10
4*10 = 40
1*10 = 10
Having a virtual pointer in the class in case we’re inheriting from a base class or have at least one virtual method declared would make the class size equal to the system’s word size (8 for 64 bit). Assume we’re on a 64 bit system for the remainder of this article.
#include <iostream>

class A { virtual int func()
			{ return -1; }};
class B : public A {};
class C {};

int main()
{
	std::cout << "sizeof(A)=" << sizeof(A) << ", ";
	std::cout << "sizeof(B)=" << sizeof(B) << ", ";
	std::cout << "sizeof(C)=" << sizeof(C) << std::endl;
	return 0;
}
sizeof(A)=8, sizeof(B)=8, sizeof(C)=1I am sure that makes you wonder how is memory even laid out. I can attempt to explain but can’t make it any simpler than this youtube video. Subscribe to Rupesh’s channel[1] please.
Question: What’d be the size of class B if it also had
- int e;
- int e,f;
- int e; double d; char x;
1. 16
|v|v|v|v|v|v|v|v| (from class A)
|e|e|e|e|-|-|-|-|

First 8 bytes are for vptr
The next 4 are occupied by integer e
Remaining 4 are empty

2. 16
|v|v|v|v|v|v|v|v| (from class A)
|e|e|e|e|f|f|f|f|

First 8 bytes are for vptr
The next 4 are occupied by integer e
And remaining 4 by integer f
3. 32
|v|v|v|v|v|v|v|v| (from class A)
|e|e|e|e|-|-|-|-|
|d|d|d|d|d|d|d|d|
|x|-|-|-|-|-|-|-|

First 8 bytes are for vptr
The next 8 are occupied by double data member
And yes, only one byte is occupied by character x
Just like a group trip, not everyone contributes equally (to class size). For example, when we have to use a bitfield. Consider a structure (MessageHeaderOut) that BSE’s Enhanced Trading Interface API uses.
| Field Name | Len | Offset | Data Type |
|---|---|---|---|
| BodyLen | 4 | 0 | unsigned int |
| TemplateID | 2 | 4 | unsigned int |
| Pad2 | 2 | 6 | Fixed String |
How are we supposed to make a structure which has 2 bytes of unsigned int? Of course one valid answer would be to
#include <cinttypes>

struct MessageHeaderOut {
	uint32_t BodyLen;
	uint16_t TemplateID;
	char Pad2[2];
};
But we are nerdy people. We’ll use just the first 2 bytes of an unsigned integer
struct MessageHeaderOut {
	unsigned int BodyLen;
	unsigned int TemplateID: 16; // 2 bytes of unsigned int
	char Pad2[2];
};
Static data members do NOT contribute to the size of a class.
#include <iostream>

class A {
	char placeholder;
public:
	static int x;
};
int A::x;

template<typename T>
class B {
	char placeholder;
public:
	static int x;
};
template<typename T>
int B<T>::x;

int main()
{
	A A_1, A_2;
	B<int> B_int_1, B_int_2;
	B<char> B_char_1, B_char_2;
	A_1.x = 123;
	B_int_1.x = 234;
	B_char_1.x = 345;

	std::cout << "A_1's x = " << A_1.x <<", A_2's x = " << A_2.x << std::endl;
	std::cout << "B_int_1's x = " << B_int_1.x <<", B_int_2's x = " << B_int_2.x << std::endl;
	std::cout << "B_char_1's x = " << B_char_1.x << ", B_char_2's x = " << B_char_2.x << std::endl;
	return 0;
}
A_1's x = 123, A_2's x = 123
B_int_1's x = 234, B_int_2's x = 234
B_char_1's x = 345, B_char_2's x = 345
All objects of A have the same x. All objects of B

Image courtesy of Department of Computer Science, Columbia University.
objdump -t -C /path/to/bin | grep .bss
# Change int A::x = 99; to send A::x to .data section

Thy precious suggests we read chapter 7 of Computer Systems book[2] for much deeper understanding.
Let’s go back to something more simple. Inhertiance. Riddle thy precious this - how does accessibility change when a different visibility modifier.
| Private | Protected | Public | |
|---|---|---|---|
| Private | X | Private | Private |
| Protected | X | Protected | Protected |
| Public | X | Protected | Public |
And while we are at it, what’s the difference between having a protected member and a private member anyway?
Just like an interview setting thy precious shall answer the easier question first.
#include <iostream>

class Base {
private:
  int notAccessible {-1};
protected:
  int derivedMethodAccessible {0};
public:
  int fullyAccessible {1};
};

class Derived : public Base {
public:
  Derived() = default;
  void ConfirmAccessibility()
  {
    std::cout << "Base's protected member value: " << derivedMethodAccessible << std::endl;
  }
};
int main()
{
	Derived d;
	d.ConfirmAccessibility();
	// d.derivedMethodAccessible; ERROR
	return 0;
}
Private members are accessible by ONLY members of the same class. We will get to having “friends” later. This implies that we can’t just declare an object of base class and try accessing its private parts.
int main()
{
	Base b;
	// b.notAccessible; ERROR Just Like Protected
	return 0;
}
We should checkout the memory layout of these Derived class objects.
class Base {
private:
	int _basePrivate;
protected:
	int _baseProtected;
public:
	int _basePublic;
};

class Derived : public Base {
	int _derivedPrivate;
public:
	int _derivedPublic;
};
Base object is laid out as
|B|B|B|B|
|B|B|B|B|
|B|B|B|B|

Derived object constructs the base subobject before derived
|B|B|B|B| Now let's play with *visibility modifier*
|B|B|B|B| And see how access to these base members get
|B|B|B|B| Affected by flipping between public, protected and private
|D|D|D|D|
Refer to the table here. X implies that the member will not be accessible anymore.
class Derived : private Base {
|B|B|B|B| RIP _basePrivate - memory stays
|B|B|B|B|  _baseProtected is to be treated as a private member of Derived
|B|B|B|B|  _basePublic is to be treated as a private member of Derived
|D|D|D|D|

class Derived : protected Base {
|B|B|B|B| RIP _basePrivate - memory stays
|B|B|B|B|  _baseProtected is to be treated as a protected member of Derived
|B|B|B|B|  _basePublic is to be treated as a protected member of Derived
|D|D|D|D|

class Derived : public Base {
|B|B|B|B| RIP _basePrivate - memory stays
|B|B|B|B|  _baseProtected is to be treated as a protected member of Derived
|B|B|B|B|  _basePublic is to be treated as a public member of Derived
|D|D|D|D|
We can notice that C++ doesn’t change the frame in which memory is laid out despite some members not being accessible down the line. Pay homage to those who came before us. Amen. “Object integrity is upheld in C++” in case the interviewer doesn’t like our jokes. Keep applying at other firms life is too short to put up with annoying people.
Friendships can be tricky. You being friend to one doesn’t imply he/she will reciprocate.
#include <iostream>

class Yash {
  int secret;
public:
  Yash(int _init=69): secret(_init) {}
  friend class Vaibhav;
};

class Vaibhav
{
  int secret;
public:
  Vaibhav(int _init=80085): secret(_init){}
  static int Display(Yash& obj)
  { return obj.secret; }
};
int main()
{
  Yash y;
  std::cout << "Value of Yash's private member via a (fake) friend: " << Vaibhav::Display(y) << std::endl;
  return 0;
}
Vaibhav has access to Yash’s private info because he is a friend according to Yash. But Yash knows no secret that Vaibhav keeps from him. Careful who you call a friend. Not everyone who smiles at you is one. Only Yash can decide who should be his friend. For the sake of poetic justice let’s see how a true friend should have behaved.
  static int Display(Yash& obj);
};
int Vaibhav::Display(Yash& obj) {
  std::cout << "A brother doesn't snitch, officer.";
  return -1;
}
| Creation | Annhilation |
|---|---|
| new | delete |
| new[] | delete[] |
| malloc() | free() |
| calloc() | free() |
Question: How did delete ptr find out it needs to delete exactly 40 bytes when it only had pointer location as its parameter (NOT size)
It’s simple actually. The allocator stores metadata for book keeping. Depending on the implementation it can be stored right before the user-space or in some other look up table. This is why we ought to use the right deallocator as mentioned in the above table.
#include <iostream>

int main()
{
  int *ptrNew = new int(10);
  int *ptrMalloc = static_cast<int*>(malloc(sizeof(int)*10));
  int ptrStack[10];

  free(ptrMalloc); // free has the metadata from malloc
  free(ptrNew); // free does NOT have ptrNew's metadata
  //delete ptrNew; // has ptrNew's metadata. Use this instead.

  return 0;
}
Using wrong deallocator is an undefined behaviour and “mismatched allocation function” warning must have been thrown at compile time itself. There might be a case of memory leak or a crash.
Book keeping data with address of first element implies that if you pass in an address that’s not int the table results in UB. Your program might also crash.
#include <iostream>

int main()
{
  int *ptrNew = new int(10);
  ptrNew++;
  free(ptrNew); // Undefined Behaviour.

  return 0;
}
Question: If malloc and new both allocate memory in heap, how are they different from each other?
Good question. Lets look at the output of the following code.
#include <iostream>

class Widget {
	int data;
public:
	Widget(): data(100) { std::cout << "Constructor of Widget was called" << std::endl;}
	int GetData() { return data; }
};

int main()
{
	Widget *mallocPointer = static_cast<Widget*>(malloc(sizeof(Widget)));
	Widget *newPointer = new Widget;
	std::cout << "newPointer->GetData():    " << newPointer->GetData() << std::endl;
	std::cout << "mallocPointer->GetData(): " << mallocPointer->GetData() << std::endl; // UB - data members were not initialized
	return 0;
}
A constructor is called only when “new” is used. Use “placement new” to invoke constructor implicitly when allocating space with malloc.
#include <iostream>
// #include <new>  // For placement new, other standard headers will be including this anyway

class Widget {
	int data;
public:
	Widget(): data(100) { std::cout << "Constructor of Widget was called" << std::endl;}
	int GetData() { return data; }
};

int main()
{
	Widget* ptr = static_cast<Widget*>(malloc(sizeof(Widget)));
	if (ptr) new(ptr) Widget();
	std::cout << ptr->GetData() <<"\n";
	return 0;
}
2. Virtual Reality
Question: Why are virtual functions slow?
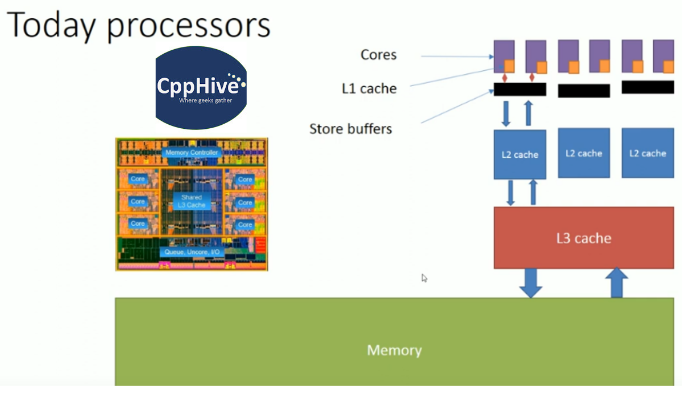
Hold your 🐎🐎🐎. There are three kinds of cache - instruction, data and unified (that handles both instruction and data).
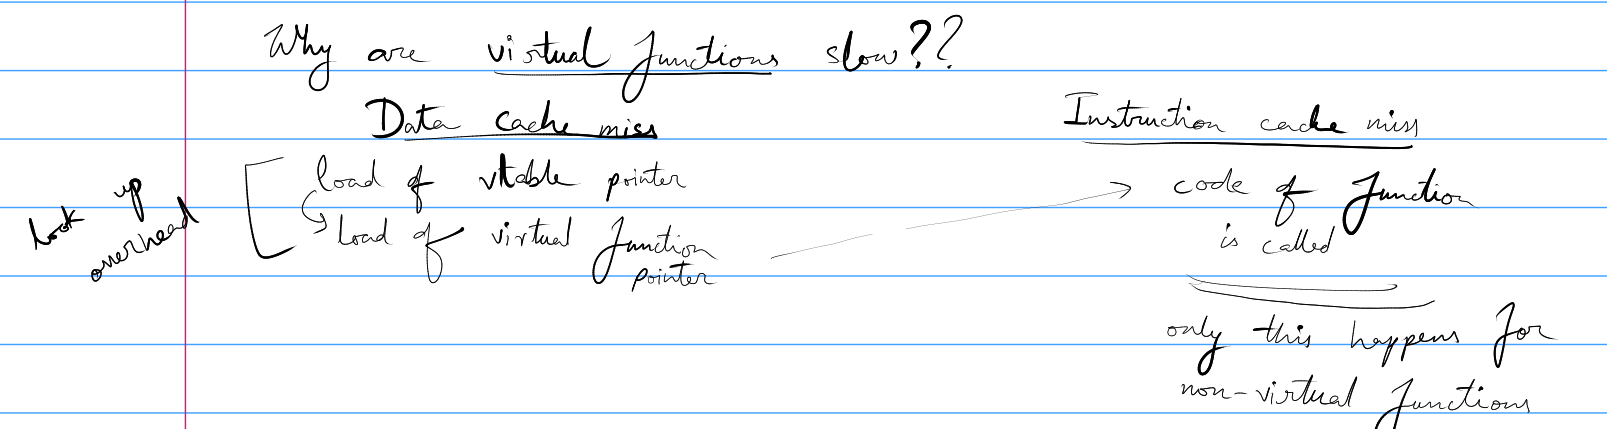
Thy precious isn't known for his penmanship. Above figure demonstrates what has been said below..
Base class has a virtual pointer that points to the virtual table. It may not be in cache that causes (1) Data Cache Miss. After having loaded this table in memory we need to get the function pointer which again may not be in cache resulting in (2) Data Cache Miss. Finally, the function instructions are executed after a potential (3) Instruction Cache Miss. Non virtual functions will only have to encounter (3).
In HFT we avoid this runtime overhead by using Curiously Recurring Template Pattern (CRTP). Let’s look at an example with virtual method and go about refactoring it.
#include <iostream>

class Base {
public:
	virtual int GetID() { return -1; }
};

class Derived : public  Base {
	int _id;
public:
	Derived(int init=1): _id(init) {}
	int GetID() { return _id; }
};


int main()
{
	Derived d;
	Base& b= d;

	std::cout << b.GetID() << std::endl;
	return 0;
}
The runtime overhead of virtual method calling will be too much of a burden. Let’s get rid of this the CRTP way.
#include <iostream>

template<typename Derived>
class Base {
	Derived& GetDerived() { return static_cast<Derived&>(*this); }
public:
	int GetID() { return GetDerived().GetID(); }
};

class Derived : public Base<Derived> {
	int _id;
public:
	Derived(int init=1): _id(init) {}
	int GetID() { return _id; }
};

int main()
{
	Base<Derived> b;
	std::cout << b.GetID() << std::endl;
	return 0;
}
That was an easy speed up now, wasn’t it?
3. Atomic Weapons[4]
For someone who has time in hand, thy precious recommends “C++ Atomic Operations and Memory Ordering” playlist by CppHive[3].
There are 6 memory ordering options.
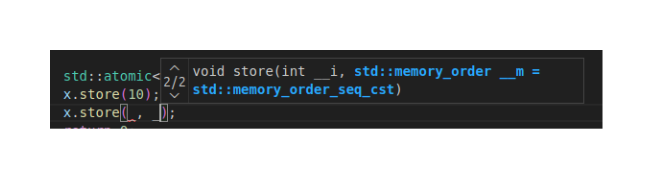
std::memory_order_seq_cst (default) - Sequential Consistent
std::memory_order_relaxed
std::memory_order_aquire
std::memory_order_release
std::memory_order_acq_rel
std::memory_order_consume
With sequential consistent, every thread will see the atomic value after the same N number of operations performed on it. Its the safest option which naturally makes it default but slow. Compiler demands overhead in terms of additional store buffer flushes and cache refreshes. Also there can be no instruction reordering optimizations.
We can specify 2 (success/failure) memory ordering for compare and exchange case.
std::memory_order_relaxed, we should be able to get rid of overhead mentioned with sequential consistent by not caring about synchronization. But do keep in mind that when all we have is a hammer then everything will look like a nail. There are good reasons for having other memory order. Sometimes we crave for limited synchronization.
So far we've understood
Write Memory Order -> Read Memory Order
---------------------------------------
(1) std::memory_order_seq_cst -> std::memory_order_seq_cst (We care A LOT about sync among threads)
(2) std::memory_order_relaxed -> std::memory_order_relaxed (We don't care about threads being in sync at all)
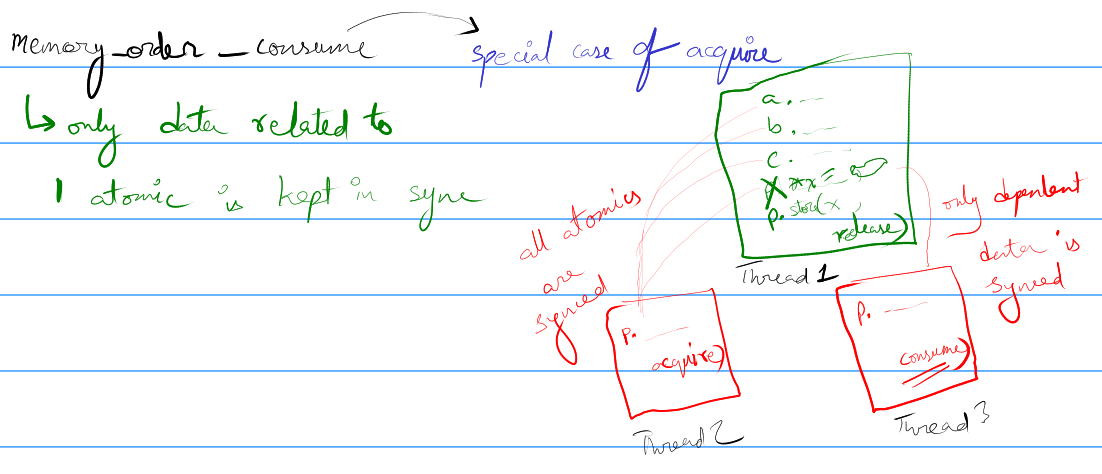 (3) std::memory_order_release -> std::memory_order_acquire (When we want sync among few variables declared)
(4) std::memory_order_release -> std::memory_order_consume Special case of acquire: Only dependent variables are in sync
(3) std::memory_order_release -> std::memory_order_acquire (When we want sync among few variables declared)
(4) std::memory_order_release -> std::memory_order_consume Special case of acquire: Only dependent variables are in sync4. Spin Lock
Give thy precious some more time to type things out
5. Smart Pointers
Give thy precious some more time to type things out
References
1. CppNuts (YouTube Channel)
2. Computer Systems by Bryant and O’Hallaron
3. CppHive (YouTube Channel)
4. Herb Sutter - Atomic Weapons (YouTube Video).
Core Dump - WTH is my core file?
“In sooth, I know not why I am so sad: It wearies me; you say it wearies you; But how I caught it…“
Thanks Shakespeare that’ll be all. Very often you’re greeted by this lovely message

All the youtube videos we’ve scrolled ask us to look for the core file to debug. Except that we don’t know where it is. Spoiler: hips don’t lie but operating systems do. It isn’t actually dumping it to memory and for good reasons. A core file is (very) expensive memory wise. It stores information about the program’s state right before crashing and depending on the complexity things can get bulky. Wanna check what’s the limit of core files that’s allowed for our session? Run
ulimit -c
Did we see a zero? That explains the size of core file processes started by us. We will get back to setting the size limit later.
First, understand that core files are saved with a name pattern attached to them. Checkout the contents of “core_pattern”
cat /proc/sys/kernel/core_pattern
|/usr/share/apport/apport -p%p -s%s -c%c -d%d -P%P -u%u -g%g -F%F -- %E
We can figure out the pattern later. Apport is a service that thy precious’s system (Ubuntu) uses to report crashes. We can figure out how to disable that in a ChatGPT query. Lets edit the contents to something more simple for now.
sudo echo "core" >/proc/sys/kernel/core_pattern
This will dump core files with the name “core” right where we executed our executable. There is just one last tweak that we need to do. Remember our size allocated for core files was 0? Let’s make it unlimited with
ulimit -c unlimited
Append this line to the bottom of your bash shell’s “run control” file: ~/.bashrc
nano ~/.bashrc
# <perform edits and save>
source ~/.bashrc
source helps us load any aliases, environment variables or settings that we want our terminal to start from. If we’re using another shell like zsh then we will be editing its rc file (~/.zshrc)
Judgement Day
Now is the time to write a buggy program. Thy precious recommends we use cpplayout to quickly setup a C++ project. Let’s quickly compile the following buggy code with debug flag:
#include <iostream>

int main()
{
	int *ptr = NULL;
	std::cout << *ptr;
	return 0;
}
g++ -g main.cpp -o program_bin
We can now run our program and watch it yield a segmentation fault with delight. Let’s look at the core file with GDB.
gdb -c ./core ./program_bin
# <enter GDB session and find the bug>
Program terminated with signal SIGSEGV, Segmentation fault.
#0 0x00005d81a948f161 in main () at main.cpp:6
6 std::cout << *ptr;
It has been revealed that dereferencing a nullptr is not a good idea. This debug info was possible because of -g flag. Read up on debugging with GDB next.
More on debugging with core dumps
The party is only getting started. We have noticed that core files are huge and production systems often rerun their BOD (beginning of day) script which can overwrite existing core files. We can do a quick ChatGPT session again to figure out saving the core file name with PID and timestamp.
Now that the setup guarantees we get our core files, we can go back to learning from YouTube tutorials. Thy precious recommends Jacob Sorber’s playlist among other good resources.
Dora The Explorer
Before reading the article thy precious strongly encourage you to watch this talk by Linus. After kicking Windows out of the hardware to ensure none of his own cores were burning cpu time to show him ads, there is one tiny inconvenience that we, the almighty novice, face.
Thy precious is going to cut you some slack. If you see a C++ repository, like C++ ZeroMQ , with “CMakeLists.txt”, read no further.
git clone https://github.com/zeromq/cppzmq.git
cd cppzmq
Now for the most part one will almost always have to
| # | Action |
|---|---|
| 1 | make a build directory to generate files in |
| 2 | get into the “build” and “cmake ..” |
| 3 | Errors (if any) would be mostly because of missing packages. Install them from apt/rpm/others |
| 4 | A “Makefile” will be generated. Make and install |
Let’s see it in action
mkdir build && cd build (step 1)
cmake ..                (step 2)
make                    (step 4. Thy precious had all dependencies.)
sudo make install       (For system wide installation)
The packages that you install for system wide usage will (usually) show up in /usr/include, /usr/lib, /usr/local/*
Making a playground
Before thy precious dives head first into coding with a new API that he hath no clue about, he usually tests it in isolation.
Let’s use cpplayout for a quick project setup.
cd /tmp && mkdir Test
cd Test
cpplayout
This is where AI can help. It can help cut down on clutter and get us straight to business.
A quick prompt reveals we need python3-zmq from apt (Ubuntu) for quick test on pub/sub. We will compare this with Kafka.
For free live market data we can opt for FinnHub API. Keep in mind if you subscribe to trade messages of exchange outside of its operational hour then you will end up with no message from the API. To avoid that debugging nightmare we simply become a crypto bro.
touch environments.env  requirements.txt  script.py
chmod +x script.py
environments.env file is used to keep secrets like API keys and should NEVER be committed. Let’s fill requirements.txt with what AI suggested us will be used.
python-dotenv
websocket-client
finnhub-python
pyzmq
Before we even start coding, store the API keys in
FINNHUB_API_KEY=usetheapikeyprovided
FINNHUB_EMAIL=email@used.com
zmq-addr=tcp://127.0.0.1:5556
zmq-hwm=2000
Now that the API keys are in place and we have decided on what libraries we need, lets start the virtual environment. Thy precious recommends you use tldr for minor queries instead of chatgpt/gemini/etc.
tldr venv               # (Quick lookup on setting up virtual environment)
python3 -m venv .venv   # (The recommendation)
source .venv/bin/activate
tldr pip                # (Quick lookup on installing packages)
pip install -r requirements.txt
#!/usr/bin/env python3
from dotenv import load_dotenv
import websocket
import os

load_dotenv("environments.env")

def on_message(ws, message):
    print(message)

def on_error(ws, error):
    print(error)

def on_close(ws):
    print("### closed ###")

def on_open(ws):
    ws.send('{"type":"subscribe","symbol":"BINANCE:BTCUSDT"}')
    # ws.send('{"type":"subscribe","symbol":"IC MARKETS:1"}')

if __name__ == "__main__":
    websocket.enableTrace(True)
    FINNHUB_API_KEY = os.getenv("FINNHUB_API_KEY")
    ws = websocket.WebSocketApp(f"wss://ws.finnhub.io?token={FINNHUB_API_KEY}",
                              on_message = on_message,
                              on_error = on_error,
                              on_close = on_close)
    ws.on_open = on_open
    ws.run_forever()
So far so good. Specific prompts on gemini has helped us get to a place where we can see live market data being ingested. Now all that we need to do is to clean things up and push data to zmq.
Why not just Kafka your way out
“Anyone who keeps the ability
to see beauty never grows old“
~ Franz Kafka
Thy precious gets it. We are performing IPC. We know how reliable Kafka is and setting it up might be an initial pain but it will run/fail in very predictable ways. But most importantly, we have spend hours studying kafka documentation[1]. So why bother with anything identical.
And that’s where the question is answered. Kafka acts like a broker of data messages. It keeps the data written by producer to a topic on it’s own server. This is the reason why we need to have a kafka instance running. A consumer queries Kafka for the required topic and partition to consume that data. ZeroMQ does no such spying.
You can imagine a publisher as someone making a phone call. The only one who gets to consume what the publisher had to share was the one at the other end of that call. It’s very direct and hence we need no middle man to manage the transfer of data.
Using Python for publishing messages to target
Now that we have seen the format of messages being received, let’s figure out a way to clean it up. What better way than sending a series of json strings that reflect trades in the market. Let’s worry about continuously sending data like its market feed for the moment as that’s what the end consumer would be expecting.
#!/usr/bin/env python3
import zmq
import json
import time

context = zmq.Context()
socket = context.socket(zmq.PUB)
socket.bind("tcp://*:5556")

# Example raw input from your websocket/source
raw_data = {"data":[{"c":None,"p":68014.52,"s":"BINANCE:BTCUSDT","t":1772091840028,"v":0.03184},{"c":None,"p":68014.52,"s":"BINANCE:BTCUSDT","t":1772091840028,"v":0.00008},{"c":None,"p":68014.52,"s":"BINANCE:BTCUSDT","t":1772091840028,"v":0.00008},{"c":None,"p":68014.52,"s":"BINANCE:BTCUSDT","t":1772091840028,"v":0.00008},{"c":None,"p":68014.52,"s":"BINANCE:BTCUSDT","t":1772091840028,"v":0.00008},{"c":None,"p":68014.52,"s":"BINANCE:BTCUSDT","t":1772091840028,"v":0.10289},{"c":None,"p":68014.52,"s":"BINANCE:BTCUSDT","t":1772091840028,"v":0.00016},{"c":None,"p":68014.52,"s":"BINANCE:BTCUSDT","t":1772091840028,"v":0.00008},{"c":None,"p":68014.52,"s":"BINANCE:BTCUSDT","t":1772091840028,"v":0.05298},{"c":None,"p":68014.52,"s":"BINANCE:BTCUSDT","t":1772091840086,"v":0.00327},{"c":None,"p":68014.53,"s":"BINANCE:BTCUSDT","t":1772091840217,"v":0.05628},{"c":None,"p":68014.53,"s":"BINANCE:BTCUSDT","t":1772091840245,"v":0.00009},{"c":None,"p":68014.53,"s":"BINANCE:BTCUSDT","t":1772091840347,"v":0.00021},{"c":None,"p":68014.52,"s":"BINANCE:BTCUSDT","t":1772091840349,"v":0.00058},{"c":None,"p":68014.52,"s":"BINANCE:BTCUSDT","t":1772091840597,"v":0.00449},{"c":None,"p":68014.52,"s":"BINANCE:BTCUSDT","t":1772091840640,"v":0.00068},{"c":None,"p":68014.52,"s":"BINANCE:BTCUSDT","t":1772091840870,"v":0.00019},{"c":None,"p":68014.53,"s":"BINANCE:BTCUSDT","t":1772091840708,"v":0.00021}],"type":"trade"}

print("Producer: Sending filtered JSON (p, s, t, v)...")

AddTime = 0
while True:
    for item in raw_data["data"]:
        # Create the slimmed-down dictionary
        slim_trade = {
            "p": item["p"],
            "s": item["s"],
            "t": item["t"]+AddTime,
            "v": item["v"]
        }

        # Send as: TOPIC + SPACE + JSON
        # Example: "BTC {"p": 68014.53, "s": "BINANCE:BTCUSDT", "t": 1772091834930, "v": 8e-05}"
        socket.send_string(f"{json.dumps(slim_trade)}")
    AddTime += 1000
    time.sleep(1)
Awesome. Now we have something to test our consumer with. Let’s build a basic consumer with C++.
C++ for consumption
We will need a Makefile for compiling the source code (src/main.cpp). Don’t forget to link zmq in the flags section with -lzmq.
# Compiler and flags
CXX := g++
CXXFLAGS := -std=c++17 -Wall -Iinclude -pthread -lzmq
Instead of topics and partitions like Kafka, ZMQ will be using prefix strings to decide if the message being shot is worth consuming. Since we consume everything we will use empty string as the prefix. Thy precious demands the call be blocking to save cpu utilization.
#include <zmq.hpp>
#include <iostream>
#include <string>

int main() {
    zmq::context_t context(1);
    zmq::socket_t socket(context, zmq::socket_type::sub);

    socket.connect("tcp://localhost:5556");

    std::string filter = "";
    socket.set(zmq::sockopt::subscribe, filter);

    std::cout << "Collecting updates for topic " << filter << "..." << std::endl;

    while (true) {
        zmq::message_t message;
        auto res = socket.recv(message, zmq::recv_flags::none);

        std::string msg_str(static_cast<char*>(message.data()), message.size());
        std::cout << "Received: " << msg_str << std::endl;
    }

    return 0;
}
Now that it’s finally done, we can run our consumer and producer in parallel.
Terminal 1: [runs C++ consumer app]
./bin/program_bin
Terminal 2: [runs Python producer app]
./script.py
We can modify this toy program that was mostly generated with AI to observe how data flows and APIs work in bytesized context. It’s simpler to understand and debug in case we run into problems (which we often will). The knowledge obtained can be used to elegantly add ZMQ to existing codebase with minimal changes and insomnia.
End result
This exercise helped us get from having 0 idea about Zero MQ to building something meaningfully large, like this repo, without vibe coding entirely.